
It’s something that happens every year, and yet it always seems to catch even the most prepared parents off guard: back-to-school season. This year, if you’re determined to avoid painfully belabored bedtimes, stressful wake-up calls, and rushed drop-offs, you’ll want to try some new strategies to help not just your kid but your entire family survive the transition. Below, seven sure-fire ways to make sure everyone gets back to school in one piece.
1. Create a visible family calendar.
Regardless of what kind of synced digital calendaring system you use, even Google can’t beat a large slab of paper tacked up on the fridge. For co-parents, it’s handy to keep a hard-copy weekly calendar in an easy-to-spot, highly trafficked place as a definitive reminder of after-school activities and childcare schedules. For older elementary-school-aged kids, it helps teach responsibility in remembering what they have to do each day.
For bonus back-to-school chore chart ideas, scroll down to the end of this article!
2. Resist screens of all types.
You might claim you only need five minutes to check your email before getting out of bed. Or maybe you have a habit of tuning into the morning news as background noise. But these are some of the most common distractions derailing adults’ mornings, especially those with kids. Do your best to put your phones away and keep laptops closed until everyone is ready for the day. Only after that should you consider scrolling through social media a reward for a job well done.

3. Fill up your freezer with slow-cooker meals.
Even the most efficient moms and dads have a hard time getting dinner on the table every weeknight. Prepare for the inevitable by spending one night prepping an inventory of freezer meals that you can call on when all else fails. Even better, choose freezable recipes that can be plopped right into your crockpot. If you know you won’t have time to cook something from scratch, you can let one of these simmer for hours on low before simply serving.

4. Slowly ease into a school-year schedule.
If you think you can wait to address your kids’ lax summer bedtimes until the last minute, you’re going to be in for a rough night—and morning—when the first day of school arrives. Instead, slowly adjust their nighttime routines and wake-up calls to each be a bit earlier over a several-week period. That way, their internal body clocks will adjust more naturally by the time the alarm goes off for real.
5. Do as much as possible the night before.
At the end of a long day, the last thing you want to do—especially after reading the 37th bedtime story of the evening—is get to work prepping for the next day. But you’ll be glad you set aside your kids’ clothes, charged their devices, and prepared meals before heading to bed, instead of rushing around in the morning … when countless other tasks always seem to pop up out of nowhere.
6. Keep your schedule wide open.
The idea of having your kid occupied with school tasks for a solid eight hours five days a week might make any busy parent jump at the opportunity to finally schedule all those long-delayed appointments. Still, it’s wise to give yourself a two-week buffer before adding doctor’s visits, haircuts, and oil changes—not to mention major work presentations or meetings, if you can help it—to your calendar. Not only is it nice to give yourself a much-needed break, but it’ll behoove parents to prepare for unexpected bumps and be available to their kids as they transition.
7. Cheat the clock.
Sometimes, despite your best efforts, you still run late. Consider putting time definitively on your side. Set alarms up to let you know when there’s just five or ten minutes before it’s time to head out or boot up, or—if you need a more serious intervention—tweak all the clocks in your house ahead. Planning to get the kids to school or logged on by 7:24 means they’ll surely be on time for their 7:30 start. Why? It’s naturally easier to remember to stick to a specific number versus a general one.
Bonus: 6 Back-To-School Charts In 15 Minutes Or Less
Brought to you by Nifty

Construction Paper Links
Supplies
Construction paper (multiple different colors)
Marker
Scissors
Glue dots
Instructions
- Cut construction paper into vertical strips.
- Using a pen, write out the chores and homework assignments that must be completed.
- Create a paper chain link using glue dots to glue the links together. Be sure to place the links in the order that you want your child to complete the chores, starting from the bottom up.
- Every time your child finishes a chore, they can remove the chain link at the bottom that corresponds to the chore that was completed.
- Enjoy!
Magnetic Chore Charts
Supplies
Magnet tape
Cardstock
Markers
Scissors
Glue dots
Instructions
- Take the construction paper and fold in half so the fold is vertical, then turn the paper so it’s on the long side and measure and mark off 2.2 inches.
- Using scissors, cut slits where the lines are just up to the middle of the paper where the fold is.
- Take a marker and draw photos that correspond to the chores or homework that you want your child to complete.
- Using scissors, cut out the drawings from the paper and glue them to the spots across the squares cut in the construction paper so they each line up with a blank square.
- Using a pen, write down the chore on each corresponding blank square.
- Tape the magnets to the top and bottom of each square/drawing, allowing them to close shut.
- Hang the open chore chart up on the wall. As your child finishes up each assignment, they can close up the squares until their homework is finished!
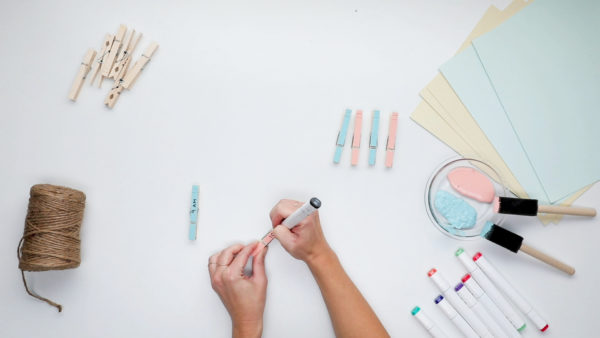 Clothespin Chore Chart
Supplies
Clothespins
Marker
Acrylic paint
Paint brush
Twine
Cardstock
Instructions
- Using a paint brush, paint one side of each clothespin. Allow them to dry.
- Using a marker, write down times on each clothespin based on how you’d like your child’s day to be split up for chores. (Example: 9AM 11AM 1PM 3PM 4:30PM, etc.)
- Cut cardstock into small index cards and write down the name of the assignment you’d like your child to complete.
- Take a cut piece of twine and pin into a wall. Then, hang the clothespins up on the twine.
- Stick the flashcards into the time slots you want your child to get started by. When your child moves to a new chore, they can remove the flashcard from the clothespin chart.
Pencil Chore Chart
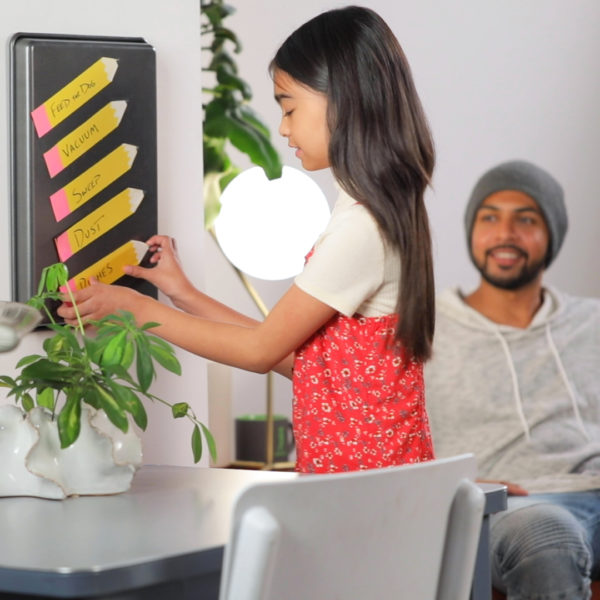
Supplies
1 double-sided adhesive sheet magnet
1 glue stick
2 sheets yellow construction paper
Black marker
Pink liquid chalk marker
White liquid chalk marker
Scissors
Pencil
Ruler
*Optional: 1 cookie sheet
Instructions
- Take one piece of adhesive sheet magnet (make sure it is double-sided, or one side won’t magnetize to the surface) and stick yellow construction paper on one side. Then, using a glue stick, stick a sheet of yellow construction paper to the other side.
- Using a pencil and a ruler, draw out the shape of a pencil.
- Cut out that shape and then use it to draw as many pencils as you need to correspond to the amount of chores. Cut all of these pencils out.
- Using a white liquid chalk marker, color in the front of the pencil tip. Let dry.
- Using a pink liquid chalk marker, color in the eraser on the back of the pencil. Let dry.
- Using a black marker, draw the pencil lead in. Let dry.
- Use black pen to write the chore on the pencil shape, then write “done” on the other side of the pencil shape.
- Color in the tip of the pencil and eraser on the side that says “done” as well.
- Stick the pencil chore magnets on the fridge or on a cookie sheet.
- Enjoy!
Chalkboard Chore Chart
Supplies
Acrylic paint, any color
Paint brush
Clothespins
Black marker
Hanging chalkboard
Liquid chalk marker
Money to your discretion
Instructions
- Using the liquid chalk marker, write “Earn Your Allowance” on the top of the board, and then write “to do” and “done” on the left- and right-hand side of the chalkboard, respectively. Draw a line down the middle to separate the two sides.
- Take the clothespins and paint one side. Let dry. Paint the other side, and let dry.
- Using black marker, write the names of the chores you’d like your child to complete on the clothespins.
- Take the dollar bills, fold them up, and pin them to the left-hand side of the chalkboard.
- Allow your child to earn his or her allowance by completing chores and moving the pin to the right hand side of the board!
Chore Wheel
Supplies
1 (15-inch) Lazy Susan
Protractor
Primer
Acrylic paint, any color
Paint brush
Adhesive vinyl sheet
Black pen
Red construction paper
D-ring hook
Screws
Screwdriver
*Optional: Stickers
Instructions
- Spray a layer of primer onto the lazy Susan. Let dry.
- Spray a layer of paint onto the lazy Susan. Let dry.
- Take an adhesive vinyl sheet and cut in half diagonally. Then cut into four triangles by slicing the other side diagonally.
- Using a ruler, measure 7.5 inches across one of the vinyl triangles and make a small mark. Then, using a protractor, create a curved edge by placing the pointy side of the protractor on the tip of the triangle and using the pencil side on the 7.5-inch mark.
- Cut out all the shapes.
- Once the Lazy Susan is dry, stick the adhesive vinyl pieces evenly onto the Lazy Susan, from the center to the edge, so there are two differently colored, alternating sections of the wheel.
- Use some chore stickers and write down the names of the chores — one per triangle.
- Flip the Lazy Susan over and screw in a d-ring hook to hang it on walls.
- Cut an arrow out of the red construction paper and tape it to a wall.
- Hang the chore wheel up onto the wall so that one chore is lined up to the arrow.
- Let your child spin the chore wheel to work on their next chore!


CarynCPerry says,
This would have been more helpful in July, school started last week!